Physarum Simulation
This project was inspired by the work done by Sage Jenson which attempts to model the behavior of the Physarum Polycephalum slime mold using an interesting simulation methodology. They very clearly communicated the concept in a visual form on that page, which I found to be incredibly useful in implementing my own simulation. I do everything after the initialization on the GPU - during the implementation of this project, I ended up learning a few new concepts about modern OpenGL (SSBOs and GLSL atomic operations).
Tweaking of simulation parameters leads to some very different behavior. The parameters are as follows, and are explained in detail below: sensor angle, sensor distance, turn angle, step size, pheremone deposit amount and pheremone decay factor.
Background
"Can you have modifiable vertex attributes?" is a question that I've found myself asking since very soon after I learned about how you can set up vertex attributes such as colors, texture coordinates, positions in space, etc. You use these things to define your model as you pass them into OpenGL, but is there a way to make these more dynamic? You can do all this math in your vertex shader, but your vertex attributes are generally used with an 'in' qualifier which I take to mean they are read only - it didn't make sense to me that there would be no way to write this data.
Enter OpenGL 4.3 SSBOs. The specification guarantees you a huge amount of space to work with for an SSBO - 128MB as a minimum, and they can be freely read from or written to in your shaders. Where vertex attributes are associated with a particular shader invocation, these buffers appear to the shader as a chunk of memory that can be arbitrarily accessed. They use the same layout/binding syntax as textures or images, so you could concieveably use a number of them if you had an application for it.
Simulation Environment
There are two major components to this simulation - the agents and the pheremone buffer. They are drawn as two separate units - many verticies (5 million+) for the agents, and then two triangles to cover the screen for the pheremone buffer. The agents make movement decisions based on the values pheremone buffer, and deposit pheremones along their path. Agents are rendered as points, with position and direction values held as vec2s in the SSBO, and the movement logic is all handled in the vertex shader - their positions and directions are seeded with std::random during the initialization, and then all further updates are handled by manipulating an SSBO in the vertex shader. They are rendered as light blue soft-edged points, which is briefly shown in the first gif in this post, but I found the patterns that form in the pheremone buffer to be much more visually interesting. The yellow color comes from the fact that the pheremone buffer is a uimage2D, which has texels in the form of unsigned integers - I used this along with some multiplication logic to set the red and green channels of the output pixel.
I believe this is the best place to mention this - I will explain further in simulation step 4 - but when the pheremone is being deposited, there is a potential dependence on the order in which the accesses are made to the pheremone buffer. While in the past I have implemented things like this with a pair of textures that are swapped each update, this approach would not work this time, because each of the simulation agents will be incrementing the value in the image, and potentially multiple vertex shader invocations would be trying to manipulate the same data at the same time. This introduces an order dependence in something that should be completely parallel from a user perspective. To solve this, I applied the use of a GLSL function added in OpenGL 4.2 - imageAtomicAdd, which will increment the value at a particular location in the image in a way that prevents me from stepping on my own toes. If it was handled as a load, increment, then store, I wouldn't be able to know if the internal implementation of the pipeline will give me the correct result.
Another synchronization issue that I came up against was in simulation step 5, in which the pheremones diffuse outwards using a gaussian kernel. This was implemented using the two-image strategy that I mentioned a moment ago, where the two images change roles as previous and current buffers each simulation update. This does not preclude the use of the approach I just described that uses imageAtomicAdd, rather it is just another layer to handle a different issue (order dependence between shader invocations when doing the gaussian blur in the compute shader).
And just as one last note here before I describe the simulation, the way in which I got random numbers for the rotation in simulation step 2 is with std::random - however, in order to avoid just using the same value across all simulation agents, I picked a number of random values, and passed them into the vertex shader each frame as an array of uniform variables (glUniform2fv()) - when I needed a random value, simply index into this array by gl_VertexID modded by the number of values you passed in. I felt this was an elegant way to handle this, so that you don't see the exact same behavior across all the simulation agents.
The 6 Steps of the Simulation Update
First of all, I would again direct you to Sage Jenson's post on this topic - the hand-drawn graphic they have on their site encapsulates everything that's involved in a very concise way. I'll attempt to go into detail here on what goes on, and give some implementation notes where I can.
1 - Sense
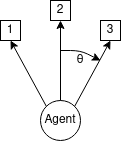
Read the current state of the pheremone buffer, at positions 1, 2 and 3 - sample 2 is taken along the current heading of the agent, while 1 is rotated by the sensor angle in the negative direction and 3 is rotated by the sensor angle in the positive direction. I noticed interesting patterns when this angle θ is obtuse - this meaning that samples 1 and 3 are actually being taken behind the agent's position.
2 - Rotate
Based on the samples taken, make a determination on how you want to turn. I implemented this with a few if statements that compared the relative magnitude of the samples, but there is room for refinement here. The general concept is that you are moving towards areas of higher concentration in the pheremone buffer - I just rotate the direction vector positively or negatively by the turn angle to realize this. In the case where samples 1 and 3 are both greater than sample 2, you use a random value for direction. I have seen mention of doing this as more of a vector sum or potentially keeping a velocity as part of the agent's state to have an acceleration applied during the next step.
3 - Move
This step is simple - you increment the position by the step size times the unit-length direction vector, and store the result back in the SSBO.
4 - Deposit
This is the last step that occurs in the vertex shader - using imageAtomicAdd, you increment the value of the texel in the current pheremone buffer in which the agent resides by the pheremone deposit amount.
5 - Diffuse
Before this step occurs, the pheremeone buffers are swapped. The current pheremone buffer becomes the previous pheremone buffer, and the previous becomes the current. This diffusion is done by a compute shader with the same dimensions as the pheremone buffer that computes the result of a 3x3 gaussian kernel in every invocation.
6 - Decay
As part of this same compute shader, scale the result of the gaussian kernel by the pheremone decay factor, and store the result back into the current image. This diffused and decayed result is the ready to serve as the current image for the next iteration of simulation step 1.
Future Directions
As I mentioned earlier, the pheremone data is stored as a 1-channel uimage2D, in which texels are simply 32 bit unsigned integers. I want to put together an alternative visualization which uses this uimage2D as a heightmap and renders it in a way similar to how I did the rendering in Vertexture. Because the mesh used in that project was just a plane of small, flat triangles, displaced by texture reads in the vertex shader, this seems like a very good application for that type of logic.
As far as other projects go, the introduction of SSBOs to my toolbox has been a major breakthrough and I'm very excited to apply it other projects. Namely, I think that I could apply the logic to the update of softbodies, in the style of my 2D and 3D implementations, but with all the computation done on the GPU.